We are progressively getting stuffed to the brim with food! For dinner tonight one of the highlights was actually a very easy dish of steamed prawns drizzled in aromatic garlic oil, spring onions and XO sauce. Mom taught me this years ago but I've added my own twists since..
Dad bought some gorgeous, large Australian prawns from the wet market so i decided to keep the prearation simple to bring out the prawns' flavour.
Garlic Steamed Prawns 蒜茸蒸中蝦
serves 3-4
Ingredients
Prawns, large (roughly 15 pcs) 600g incl shell
Garlic, grated or finely chopped 6pcs
Spring onions, finely chopped 2-3 stalks
Corn starch 1 tsp
Salt 1/2 tsp
Oil 3 Tbsp
XO Sauce 1 tsp
Directions
1. Wash and de-vein prawns. You can choose to keep the heads or remove them like i did (great for making seafood stock!).
2. You can lay out the prawns on a dish anyway you like, but in my case i like to do them "scorpion" style not just because i think it looks more impressive, but for practical reasons. This way after the prawns are cooked the shape holds and keeps seasoning in place (see photos and you'll know why!). Here's how - lay prawn on cutting board sideways, curled and gently slice prawn into half, leaving the top and tail ends connected. Flip tail end over, carefully pull through the hole in the centre and voila! Lay neatly on dish.
3. Lightly sprinkle corn starch over prawns and spread out evenly. Set aside.
4. In a lightly heated pan, add oil and saute garlic until very mildly golden brown. Note that if you grated the garlic this process happens much sooner and you need to keep stirring quickly to avoid burning the garlic. Add in salt, stir in XO Sauce and remove from heat.
5. Sprinkle spring onions over prawns, then evenly spoon hot garlic oil mixture over prawns. I love the sizzling sound when the oil hits the spring onions!
6. Prepare for steaming! In a wok, add hot water and bring to a bubbly boil. Even better if you have a steamer but I do it the old-fashioned way. Place dish on steaming rack and steam on medium heat for 5-7 minutes depending on the thickness of your dish. Once done, carefully lift lid and make sure no water droplets fall into the dish.
7. Serve immediately, and if you like, just a very small dash of soy sauce on top.
This is extremely easy, quick and minimal preparation time! You can actually add much more oil to fry the garlic, then drain off the excess oil through a fine mesh and keep it covered for future use! Think vegetable stir-fry or even over steamed fish!
Eat up!
Official Photographer - Dad (very dedicated!!)
Sous Chef - Jack
Showing posts with label Mom's. Show all posts
Monday, January 23, 2012
Chinese New Year Recipes Part 3 - Simple Garlic Steamed Prawns 蒜茸蒸中 蝦
Labels:
Hong Kong,
Mom's,
Quick and Easy,
Recipes
Chinese New Year Recipes for Reunion Dinner 2012 Part 2 - Braised BeefBrisket and White Radish in Chu Hau Sauce 柱候燜牛腩
Next on the menu was a Hong Kong classic - Braised Beef Briskets in Chu Hau Sauce! You can have this dish on its own, or add this to cooked noodles for a complete meal!
Mom's Braised Beef Brisket and White Radish in Chu Hau Sauce 柱候燜牛腩
Ingredients
Beef Brisket, cut into 2 inch cubes 800g
White Radish, cubed 1pc
Lee Kum Kee Chu Hau Sauce 柱候醬 1 Tbsp
Rock Sugar 冰糖 30g
Ginger 4 thin slices
Garlic clove, grated 1pc
Star Anise 1pc
Soy Sauce 2 Tbsp
Sugar 1 tsp or to taste
Salt 1 tsp
Oil 2 Tbsp
Water 1 1/2 cup
Oyster Sauce 1 Tbsp
Shaoxing Wine (or any rice wine) 1 Tbsp
Directions
1. Bring a pot or a deep pan to med-high heat. Saute ginger slices in about 1 Tbsp of oil, add salt and radish cubes, half of the rock sugar and allow to cook in its own juices for 10 mins or until radish is soft and cooked through. Remove from heat and set aside. Keep the juices too!
2. Bring the pot to med-high heat again, add 1 Tbsp oil and pan fry Beef Brisket pieces until lightly golden brown.
3. At this stage, depending on hour fatty your beef is, you may wish to remove the meat from the pot, pour away the excess oil and rinse beef once through in hot water before returning the beef to heat.
4. Sprinkle in Shaoxing Wine,let it sizzle and stir in Chu Hau Sauce. Add 1 cup water and adjust amount as needed depending on the depth of your pot, making sure that the beef is just submerged. Add remaining Rock Sugar, and grated garlic. Bring to a boil and reduce heat to medium, cover with lid and let simmer for 45 mins to an hour, adding only small amounts of water as needed to prevent from drying out completely.
5. After an hour, the sauce should have significantly reduced to a thick, dark, caramelised mixture. Add in cooked radish and its juices to the pot, add 1/2 cup water. Add oyster sauce, soy sauce, sugar to taste, and serve.
We loved the intense flavour and how the radish soaked up all the beefy goodness!
Eat up!
Mom's Braised Beef Brisket and White Radish in Chu Hau Sauce 柱候燜牛腩
Ingredients
Beef Brisket, cut into 2 inch cubes 800g
White Radish, cubed 1pc
Lee Kum Kee Chu Hau Sauce 柱候醬 1 Tbsp
Rock Sugar 冰糖 30g
Ginger 4 thin slices
Garlic clove, grated 1pc
Star Anise 1pc
Soy Sauce 2 Tbsp
Sugar 1 tsp or to taste
Salt 1 tsp
Oil 2 Tbsp
Water 1 1/2 cup
Oyster Sauce 1 Tbsp
Shaoxing Wine (or any rice wine) 1 Tbsp
Directions
1. Bring a pot or a deep pan to med-high heat. Saute ginger slices in about 1 Tbsp of oil, add salt and radish cubes, half of the rock sugar and allow to cook in its own juices for 10 mins or until radish is soft and cooked through. Remove from heat and set aside. Keep the juices too!
| That little brown lump in the centre is the Rock Sugar |
| Searing the briskets...so succulent~ |
4. Sprinkle in Shaoxing Wine,let it sizzle and stir in Chu Hau Sauce. Add 1 cup water and adjust amount as needed depending on the depth of your pot, making sure that the beef is just submerged. Add remaining Rock Sugar, and grated garlic. Bring to a boil and reduce heat to medium, cover with lid and let simmer for 45 mins to an hour, adding only small amounts of water as needed to prevent from drying out completely.
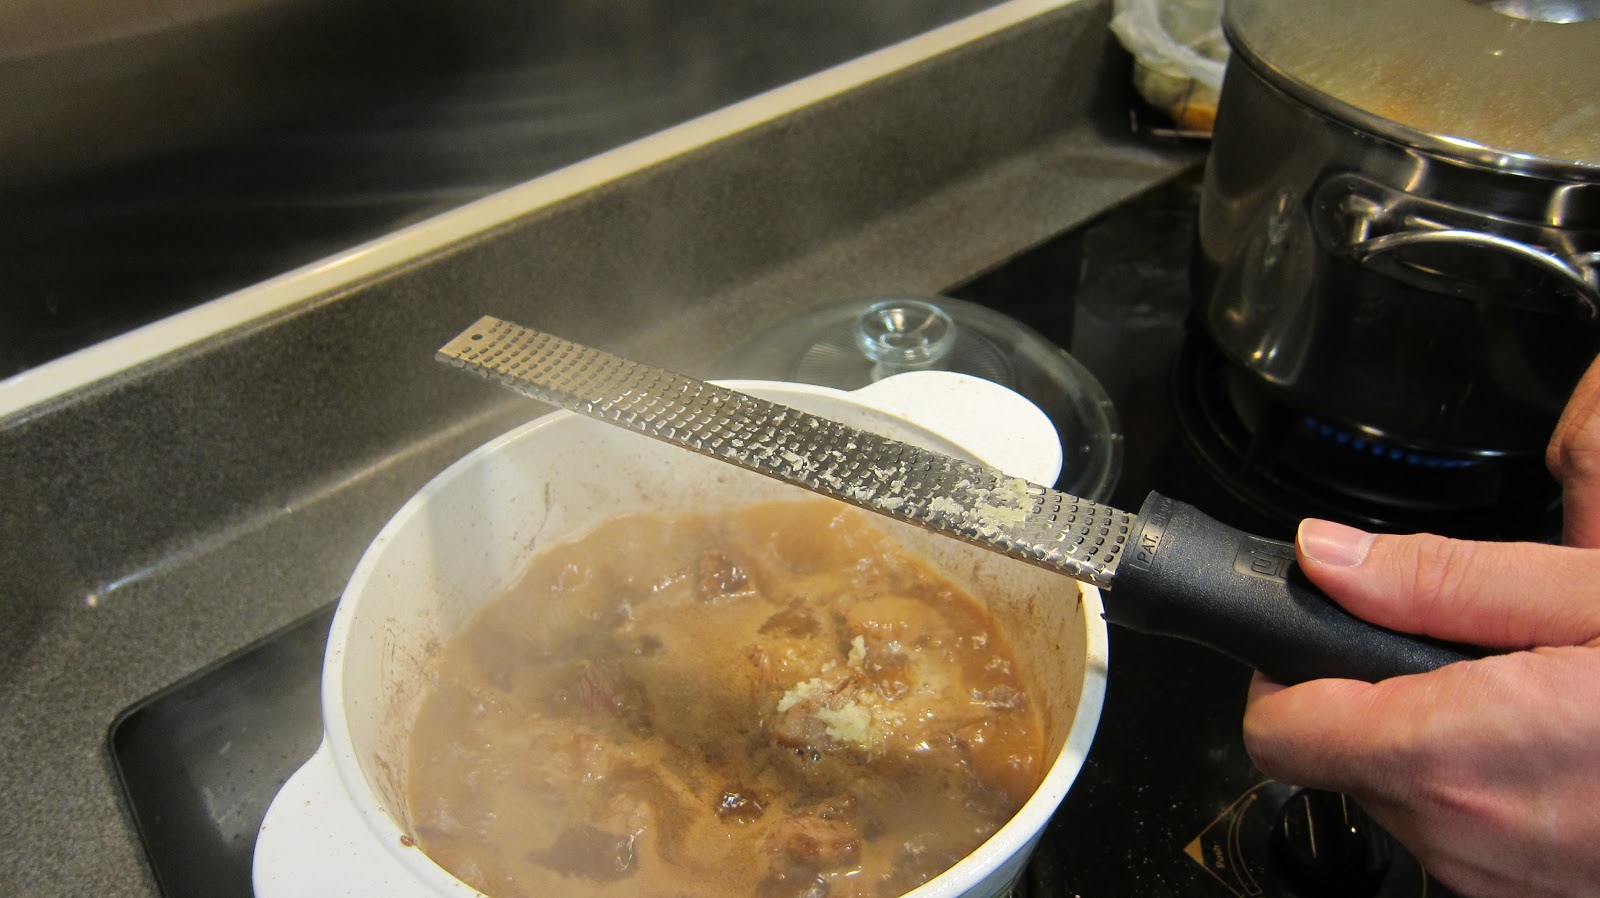
| The beauty of this Mircoplane grater is that it immediately releases the aroma, but leaves no smelly fingers! |
We loved the intense flavour and how the radish soaked up all the beefy goodness!
Eat up!
Sunday, January 22, 2012
Chinese New Year Recipes for Reunion Dinner 2012 Part 1 - Soy SauceChicken 䜴油雞
As promised, i will post more of our favourite recipes especially over this Chinese New Year since I am back in Hong Kong and home with the Maks. Jack (the younger Ah Mak) and I have vowed to cook up a storm this trip home and already we have planned the meals for the next few days, albeit simple dishes. We are of course working under very close supervision from mom who ensures we follow every step closely when it came to Por Por's recipes!
Menu for tonight:
- Soy Sauce Chicken
- Braised Beef Brisket with Radish
- Stir Fried giant Kailan stalk
- Yellow Cucumber Soup
First up is our favourite Soy Sauce chicken! According to mom, this works best with fresh chicken, not frozen, which up till recently is still readily available in HK, and the outcome is often more flavourful than what we could get in Singapore. However I believe that this will still work well with Sakura or Kampung chicken which i have yet to try, so if anyone does so before I do, let me know how it tasted!
Por Por's Soy Sauce Chicken 䜴油雞
Serves 4-6
Ingredients
Chicken, whole approx 1.5kg
Sugar 4-5 Tbsp
Garlic cloves, peeled 2pcs
Star Anise 1pc
Spring Onion, cut in 3 inch sections, 2 stalks
Soy Sauce 3/4 cup
Water 1/2 cup
Oil 2 Tbsp
Shaoxing Wine 3 Tbsp
Ginger, finely grated or chopped 1 Tbsp
Directions
1. Mix grated ginger in shaoxing wine. This will be used as a rub for the chicken
2. Wash and drain whole chicken, pat dry with kitchen towel. If your whole chicken comes with liver and gizzards, do the same as well.
3. Brush ginger wine (or rub with your hands, though gloves recommended unless you wanna smell of ginger) thoroughly, coating the outer shell as well as the insides and gizzards/ liver
4. Next, you basically try to simulate a rotissierie, in a wok, so have a pair of thongs or wooden spoon ready! In a hot wok, add the oil and saute garlic cloves. Carefully place chicken into the wok (thongs/ wooden spoon holding on to the insides...) and leave to pan fry on one side till golden brown. Repeat the same on all 4 sides till evenly coloured.
5. Sprinkle 3 Tbsp of the soy sauce over the chicken, while rotating the chicken briefly. Then add remaining soy sauce, water, sugar, spring onion, star anise and bring to a boil.
6. Scoop some of the sauce into the inside of the chicken. Cover with lid and on medium to low heat allow to simmer for 15 mins, then turn chicken over and repeat for another 15 mins. Pierce chicken thigh to check that meat is cooked and juices are clear.
7. Leave chicken to cool before chopping up into pieces to serve.
8. To prepare gravy, remove surface oil from the sauce used to cook chicken, bring sauce back to heat, simply add 1 tsp cornstarch to thicken slightly and pour over cut chicken pieces. (the lazy alternative is just to pop the sauce in microwave, minus the cornstarch, and voila!)
Got the thumbs up from the family on this dish, though really need to brush up on knife skills with chopping up the chicken!
Eat up!
Official Photographer - Mom
Sous Chef - Jack
Menu for tonight:
- Soy Sauce Chicken
- Braised Beef Brisket with Radish
- Stir Fried giant Kailan stalk
- Yellow Cucumber Soup
Por Por's Soy Sauce Chicken 䜴油雞
Serves 4-6
Ingredients
Chicken, whole approx 1.5kg
Sugar 4-5 Tbsp
Garlic cloves, peeled 2pcs
Star Anise 1pc
Spring Onion, cut in 3 inch sections, 2 stalks
Soy Sauce 3/4 cup
Water 1/2 cup
Oil 2 Tbsp
Shaoxing Wine 3 Tbsp
Ginger, finely grated or chopped 1 Tbsp
Directions
1. Mix grated ginger in shaoxing wine. This will be used as a rub for the chicken
2. Wash and drain whole chicken, pat dry with kitchen towel. If your whole chicken comes with liver and gizzards, do the same as well.
3. Brush ginger wine (or rub with your hands, though gloves recommended unless you wanna smell of ginger) thoroughly, coating the outer shell as well as the insides and gizzards/ liver
4. Next, you basically try to simulate a rotissierie, in a wok, so have a pair of thongs or wooden spoon ready! In a hot wok, add the oil and saute garlic cloves. Carefully place chicken into the wok (thongs/ wooden spoon holding on to the insides...) and leave to pan fry on one side till golden brown. Repeat the same on all 4 sides till evenly coloured.
| See how little oil it requires... enough fats on the skin! |
6. Scoop some of the sauce into the inside of the chicken. Cover with lid and on medium to low heat allow to simmer for 15 mins, then turn chicken over and repeat for another 15 mins. Pierce chicken thigh to check that meat is cooked and juices are clear.
| This is the meatiest part of the chicken |
| Love the beautiful brown colour! Next time I will be gentler and not tear the skin! |
| I think it doesn't look half bad :) |
Got the thumbs up from the family on this dish, though really need to brush up on knife skills with chopping up the chicken!
| Jack and his psycho murderer look... |
Official Photographer - Mom
Sous Chef - Jack
Wednesday, April 7, 2010
Ah Mak's Home-Cooked Dinner in under an hour!
Comfort food for us has always been a yummy home-cooked meal from Mous. But since the parents have moved back to HK several years back, I've taken over in whipping up a dish or two from time to time so we can revisit our favourites. It's never anything fancy, just some simple form of stir-fry, and a flavourful soup with rice.
This is exactly why I decided to start this blog a few months ago - to document delicious, yet easy-to-do dishes that I've grown up with! My aim is to share these recipes with those who love to cook, but more importantly, those who DON'T cook! Hopefully these recipes will show them that a home-cooked meal is easily achievable and what joy it is to feed family and friends. :)
Today, after a long hiatus from the kitchen aside from baking stuff, I'd decided to cook a simple dinner for Kays and Jack. I grabbed some quick groceries from the supermarket (spent less than $15) and got cracking. Dinner was ready within 1 hour, just as the 2 boys reached home! (Didn't cook soup this time round)
I don't move especially fast, nor do I have special shortcuts to be able to whip up a meal relatively quickly. The only key to this is PLANNING.
What I'm about to say is probably common sense to most, but if not planned properly, one would spend lots of time, re-cutting, re-washing utensils, or end up in a last minute rush... All of which still happens to me from time to time.
1. Plan your ingredients/ utensils - what do you need, how much do you need and when do you need them? Are there common ingredients (like garlic & onion) that will be used more than once? If so, combine the quantities and wash, peel, chop etc altogether.
2. Plan your preparation steps - for me, it almost always goes like this: wash, cut, marinade, cook. And as much as possible, I find way to work a few steps in parallel to save time.
3. Plan the order of the dishes you want to cook - for example I would leave any deep frying to the end, because I want to retain the crispiness, just as I would steamed fish or prawns, because you don't want the food to turn cold while you prepare other dishes and have to reheat it again and overcook the meat.
So, let's start the clock!
Serves 3-4 persons
7:00 pm
- Put on my apron and line up all the ingredients!
- Cook rice on "quick cook" mode
- Wash & cut ingredients :
4 tomatoes, roughly diced
2 stalks spring onions, finely chopped
6 cloves garlic, finely chopped
1 eggplant, cut into thick strips (you may want to soak the cut pieces in salted water to prevent them from oxidizing)
1 head lettuce, peeled, washed and drained
7:15pm
- Marinate/ Prepare other ingredients:
4 eggs, lightly beaten with 1/2 tsp salt
300g minced pork, seasoned with 2 tsp light soy sauce, 1 tsp sugar & some pepper
1 packet Lee Kum Kee Spicy Garlic Eggplant Sauce
2 Tbsp tomato ketchup
- Line up all prep-ed ingredients and I was ready to roll!
- Half fill a large pot with water, add 1 tsp salt, drizzle some olive oil and bring to a boil
- Then working in parallel, heat up a wok/ frying pan. Once it's hot enough, add 2 Tbsp oil, swirl around and pour in the beaten eggs. Flip over once the bottom has cooked, and randomly chop up the "omelette" as you stir fry. Remove and set aside.
This is exactly why I decided to start this blog a few months ago - to document delicious, yet easy-to-do dishes that I've grown up with! My aim is to share these recipes with those who love to cook, but more importantly, those who DON'T cook! Hopefully these recipes will show them that a home-cooked meal is easily achievable and what joy it is to feed family and friends. :)
Today, after a long hiatus from the kitchen aside from baking stuff, I'd decided to cook a simple dinner for Kays and Jack. I grabbed some quick groceries from the supermarket (spent less than $15) and got cracking. Dinner was ready within 1 hour, just as the 2 boys reached home! (Didn't cook soup this time round)
from left: egg with tomatoes, spicy eggplant with pork,
blanched lettuce with oyster sauce
What I'm about to say is probably common sense to most, but if not planned properly, one would spend lots of time, re-cutting, re-washing utensils, or end up in a last minute rush... All of which still happens to me from time to time.
1. Plan your ingredients/ utensils - what do you need, how much do you need and when do you need them? Are there common ingredients (like garlic & onion) that will be used more than once? If so, combine the quantities and wash, peel, chop etc altogether.
2. Plan your preparation steps - for me, it almost always goes like this: wash, cut, marinade, cook. And as much as possible, I find way to work a few steps in parallel to save time.
3. Plan the order of the dishes you want to cook - for example I would leave any deep frying to the end, because I want to retain the crispiness, just as I would steamed fish or prawns, because you don't want the food to turn cold while you prepare other dishes and have to reheat it again and overcook the meat.
So, let's start the clock!
Serves 3-4 persons
7:00 pm
- Put on my apron and line up all the ingredients!
- Cook rice on "quick cook" mode
- Wash & cut ingredients :
4 tomatoes, roughly diced
2 stalks spring onions, finely chopped
6 cloves garlic, finely chopped
1 eggplant, cut into thick strips (you may want to soak the cut pieces in salted water to prevent them from oxidizing)
1 head lettuce, peeled, washed and drained
Cut tomatoes into wedges and then dice, pulp portion optional
- Marinate/ Prepare other ingredients:
4 eggs, lightly beaten with 1/2 tsp salt
300g minced pork, seasoned with 2 tsp light soy sauce, 1 tsp sugar & some pepper
1 packet Lee Kum Kee Spicy Garlic Eggplant Sauce
2 Tbsp tomato ketchup
- Line up all prep-ed ingredients and I was ready to roll!
All in the right place!
7:25pm- Half fill a large pot with water, add 1 tsp salt, drizzle some olive oil and bring to a boil
- Then working in parallel, heat up a wok/ frying pan. Once it's hot enough, add 2 Tbsp oil, swirl around and pour in the beaten eggs. Flip over once the bottom has cooked, and randomly chop up the "omelette" as you stir fry. Remove and set aside.
- Rinse the wok and return to heat. Saute half of the chopped garlic and add chopped tomatoes and stir on medium/ high heat. Season with 4 tsp sugar, 1 tsp salt, 2 Tbsp tomato ketchup and stir quicky for about 30 seconds. Add in cooked eggs, coat with sauce... and voila!!
- Meanwhile, my rice is also cooked!
Savoury flavours from the eggs go very well with the tanginess from the tomatoes
- very appetising especially for kids!
7:35 pm
- By now, the pot of water should be boiling quite furiously. Gently add in the lettuce leaves and make sure all of it is submerged. Cook on medium heat for 2 minutes before draining and placing in a serving dish. Drizzle some oyster sauce, and you're done!
Can't get simpler than this!
7:45 pm
- Ok, time for the last dish. First, heat up wok on medium/high, add 2 Tbsp oil and stir fry eggplant until cooked through and softened. If it still looks a little too chewy, add 2 Tbsp water and leave to boil until reduced. Set aside.
- Return the wok to medium/ high heat, saute remaining chopped garlic and very quickly stir in the minced pork, pressing down from time to time to ensure it's cooked through and separated into small chunks. Add LKL spicy garlic eggplant sauce, stir through and allow to simmer for 1 minute before adding in eggplants and spring onions. Simmer for 2 more minutes, and serve! Easy right?
Fragrant, mildly spicy pork with squishy eggplants - I like~
... And 1 hour is up! Eat up! :P
Labels:
Chinese,
Hong Kong,
Mom's,
Quick and Easy,
Recipes
Sunday, February 14, 2010
CNY Recipes Part 3: Por Por's Deep Fried Stuffed Eggplants
This is one of our favourite dishes that our grandma (Por Por) cooked, and everytime I went home to HK, we'd request for it and she'd be more than happy to do it for us! Her meticulousness in the kitchen is amazing and every piece of stuffed eggplant was always uniformly thin, deep fried to fluffy perfection.
This CNY, I decided to pay tribute to our dear Por Por (though mine is a far cry from hers), and I'm happy that the Woos loved it!
Serves 6-8
Ingredients:
2 Eggplants/ Brinjals (it's ok to use either the short stumpy or long skinny ones, as long as you create enough surface area when you slice. Slice diagonally if you're using the skinny ones)
200g Dory Fillet (actually any boneless white fish will do)
1 stalk Spring Onions, finely chopped
- Seasoning for Fish Paste -
1 Tbsp Seasame Oil
1 tsp Pepper
2 tsp Sugar
1 Tbsp Soy Sauce
2 tsp Corn Flour
2 tsp Salt
- Batter for Deep Frying -
1/2 cup Self Raising Flour (because it's more convenient! Alternatively, use the same amount of Plain flour and add 1/2 tsp baking powder)
1 tsp Salt
1 egg (optional - and I say optional because I forgot to add it today!)
1 tsp Oil
Water
Directions:
1. Prepare batter by mixing flour, salt, oil and egg. Add in water slowly until mixture becomes smooth with no lumps (you can use a whisk, but Por Por used chopsticks so I did too!). You've got the right consistency when it's just thick enough to form a coating on your whisk/ chopsticks and about half of it drips back in. Allow to stand for at least 20 mins to rise.
2. Mince fish fillets in a food processor (this I was too lazy to emulate :P , Por Por chops it up herself). Place in a large mixing bowl and add in Spring Onions and seasoning. Quickly stir and mix fish until it becomes a paste. Leave in the fridge to marinade and set for 20 mins.
3. Slice eggplants thinly, leaving a gap in each slice (i.e. when cutting the eggplants - don't slice all the way through the first time, but slice through the next slice, and you get a "eggplant pita"). Stuff eggplants with fish paste.
4. Coat eggplants in batter, deep fry in a wok/ deep pot until golden brown. Drain Oil and serve while it's hot (I added Ah Mak's Bei Fong Tong topping, but you can also serve with chilli sauce or mayo... anything!)!!
EAT UP!
*An alternative to fish paste is actually cheese! Simply tear kraft singles into small pieces, and deep fry the same way - this becomes more of an italian dish now! The cheese melts and also fuses somewhat with the batter... oh how I love burnt cheese! The eggplants can also be deep fried plain... and you can add some variety by also deep frying cucumber and sweet potato slices.*
This CNY, I decided to pay tribute to our dear Por Por (though mine is a far cry from hers), and I'm happy that the Woos loved it!
Serves 6-8
Ingredients:
2 Eggplants/ Brinjals (it's ok to use either the short stumpy or long skinny ones, as long as you create enough surface area when you slice. Slice diagonally if you're using the skinny ones)
200g Dory Fillet (actually any boneless white fish will do)
1 stalk Spring Onions, finely chopped
- Seasoning for Fish Paste -
1 Tbsp Seasame Oil
1 tsp Pepper
2 tsp Sugar
1 Tbsp Soy Sauce
2 tsp Corn Flour
2 tsp Salt
- Batter for Deep Frying -
1/2 cup Self Raising Flour (because it's more convenient! Alternatively, use the same amount of Plain flour and add 1/2 tsp baking powder)
1 tsp Salt
1 egg (optional - and I say optional because I forgot to add it today!)
1 tsp Oil
Water
Directions:
1. Prepare batter by mixing flour, salt, oil and egg. Add in water slowly until mixture becomes smooth with no lumps (you can use a whisk, but Por Por used chopsticks so I did too!). You've got the right consistency when it's just thick enough to form a coating on your whisk/ chopsticks and about half of it drips back in. Allow to stand for at least 20 mins to rise.
2. Mince fish fillets in a food processor (this I was too lazy to emulate :P , Por Por chops it up herself). Place in a large mixing bowl and add in Spring Onions and seasoning. Quickly stir and mix fish until it becomes a paste. Leave in the fridge to marinade and set for 20 mins.
3. Slice eggplants thinly, leaving a gap in each slice (i.e. when cutting the eggplants - don't slice all the way through the first time, but slice through the next slice, and you get a "eggplant pita"). Stuff eggplants with fish paste.
4. Coat eggplants in batter, deep fry in a wok/ deep pot until golden brown. Drain Oil and serve while it's hot (I added Ah Mak's Bei Fong Tong topping, but you can also serve with chilli sauce or mayo... anything!)!!
EAT UP!
*An alternative to fish paste is actually cheese! Simply tear kraft singles into small pieces, and deep fry the same way - this becomes more of an italian dish now! The cheese melts and also fuses somewhat with the batter... oh how I love burnt cheese! The eggplants can also be deep fried plain... and you can add some variety by also deep frying cucumber and sweet potato slices.*
CNY Recipes Part 2: Braised Vegetables with Red Fermented Beancurd 南乳燜齋
Continuing from Part 1, this recipe requires more preparation time (some to be done the night before). On the first day of CNY where we 開年 we'd usually go "vegetarian" and have lighter dishes given that we'd feasted the night before. My mom taught me how to cook this step by step over the phone!
Depending on the ingredients used, steps could vary, but this is my personal favourite mix (and sounds auspicious too!). The use of fermented beancurd (南乳) adds a strong toasted flavour to the dish and is available in most supermarket/ wet markets.
Ingredients:
30g Dried Mushrooms 冬菇
200g Dried Oysters 蚝豉
1 pkt "Fatt Choy"/ Black Moss 發菜
20g Gluten 生根
20g Fried Beancurd 豆卜
1 (small) pkt Vermicelli 粉絲 (alternatives: Korean Dang Myeon or Japanese Shirataki noodles provide a more chewy texture)
50g Beancurd Sheets 腐竹
1 White Raddish, julienned
1 Chinese Long Cabbage, cut in 1" strips
- Seasoning for Stewed Mushrooms -
2 slices Ginger
1 Tbsp Oyster Sauce
1 tsp Soy Sauce
2 tsp Sugar
1/2 cup Water
1 tsp Shaoxing Wine
2 stalks Spring Onions, cut into 2" sections
- Seasoning for Braised Vegetables
2 cubes Red Fermented Beancurd 南乳, mashed
1 cube Chicken Stock, mashed
1 Tbsp Soy Sauce
2 tsp Sugar
2 Tbsp Oyster Sauce
1 tsp Salt
1 tsp Shaoxing Wine
1/2 cup Water
3 slices Ginger
Directions:
1. On the night before you intend to cook this dish, a few preparation steps -
(A) Mushrooms - soak dried mushrooms with cold water overnight
(B) Beancurd Sheets 腐竹 - tear into short 3" sections, discarding bent portions. Soak in hot water overnight/ till soft
2. On the day itself -
(A) Mushrooms - rinse & trim stems off softened mushrooms, reserve water for stock. In a non-stick pot, saute 2 slices of ginger. Add mushrooms and stir fry evenly, add "Seasoning for stewed mushrooms" & enough water to cover the top of the mushrooms. Leave to cook on medium/low heat for 40mins - 1 hour or till soft.
(C) Dried Oysters 蚝豉 - soak in hot water, covering with lid, for 15 mins. Wash to remove any traces of sand & drain off excess water. Saute with 2 slices of ginger, and spring onions. Drizzle Shaoxing wine and remove ginger/ spring onions once liquid is reduced.
(D) "Fatt Choy" 發菜 - soak with cold water, drizzle small amount of oil to hep trap and dirt, Rinse with water and cut through twice with scissors. Saute with (C) before adding to mushrooms at the half hour mark. Add oyster sauce to taste.
(E) Gluten 生根, Fried Beancurd 豆卜 - scald with boiling water, to remove outer layer of oil, rinse and wash twice, squeeze out any excess water and set aside.
(F) Cut White Radish and Long cabbage into strips. I personally liked the White Raddish really thin!
(G) Vermicelli 粉絲 - soak with cold water and cut through once with scissors.
3. Finally, time to cook! Saute Ginger, Fermented Beancurd in a deep pot/ large wok. Add (E) + Long Cabbage so that more liquid is produced.
4. Add White Raddish, Water and a pinch of salt to taste. Cook till softened.
5. Add (A)-(D) and bring to a boil.
6. Add Vermicelli & Beancurd sheets (these need to be added last as they are super absorbent, and also beancurd sheets, when cooked too long, will start to disintegrate)
7. Add Oyster Sauce, Soy Sauce, Sugar to taste. (Optional: Thicken stew with cornstarch/ water mix)...
*wipe sweat* EAT UP! :D
Depending on the ingredients used, steps could vary, but this is my personal favourite mix (and sounds auspicious too!). The use of fermented beancurd (南乳) adds a strong toasted flavour to the dish and is available in most supermarket/ wet markets.
南乳燜齋
Serves 6-8 Ingredients:
30g Dried Mushrooms 冬菇
200g Dried Oysters 蚝豉
1 pkt "Fatt Choy"/ Black Moss 發菜
20g Gluten 生根
20g Fried Beancurd 豆卜
1 (small) pkt Vermicelli 粉絲 (alternatives: Korean Dang Myeon or Japanese Shirataki noodles provide a more chewy texture)
50g Beancurd Sheets 腐竹
1 White Raddish, julienned
1 Chinese Long Cabbage, cut in 1" strips
- Seasoning for Stewed Mushrooms -
2 slices Ginger
1 Tbsp Oyster Sauce
1 tsp Soy Sauce
2 tsp Sugar
1/2 cup Water
1 tsp Shaoxing Wine
2 stalks Spring Onions, cut into 2" sections
- Seasoning for Braised Vegetables
2 cubes Red Fermented Beancurd 南乳, mashed
1 cube Chicken Stock, mashed
1 Tbsp Soy Sauce
2 tsp Sugar
2 Tbsp Oyster Sauce
1 tsp Salt
1 tsp Shaoxing Wine
1/2 cup Water
3 slices Ginger
Directions:
1. On the night before you intend to cook this dish, a few preparation steps -
(A) Mushrooms - soak dried mushrooms with cold water overnight
(B) Beancurd Sheets 腐竹 - tear into short 3" sections, discarding bent portions. Soak in hot water overnight/ till soft
2. On the day itself -
(A) Mushrooms - rinse & trim stems off softened mushrooms, reserve water for stock. In a non-stick pot, saute 2 slices of ginger. Add mushrooms and stir fry evenly, add "Seasoning for stewed mushrooms" & enough water to cover the top of the mushrooms. Leave to cook on medium/low heat for 40mins - 1 hour or till soft.
(C) Dried Oysters 蚝豉 - soak in hot water, covering with lid, for 15 mins. Wash to remove any traces of sand & drain off excess water. Saute with 2 slices of ginger, and spring onions. Drizzle Shaoxing wine and remove ginger/ spring onions once liquid is reduced.
(D) "Fatt Choy" 發菜 - soak with cold water, drizzle small amount of oil to hep trap and dirt, Rinse with water and cut through twice with scissors. Saute with (C) before adding to mushrooms at the half hour mark. Add oyster sauce to taste.
(E) Gluten 生根, Fried Beancurd 豆卜 - scald with boiling water, to remove outer layer of oil, rinse and wash twice, squeeze out any excess water and set aside.
(F) Cut White Radish and Long cabbage into strips. I personally liked the White Raddish really thin!
(G) Vermicelli 粉絲 - soak with cold water and cut through once with scissors.
3. Finally, time to cook! Saute Ginger, Fermented Beancurd in a deep pot/ large wok. Add (E) + Long Cabbage so that more liquid is produced.
4. Add White Raddish, Water and a pinch of salt to taste. Cook till softened.
5. Add (A)-(D) and bring to a boil.
6. Add Vermicelli & Beancurd sheets (these need to be added last as they are super absorbent, and also beancurd sheets, when cooked too long, will start to disintegrate)
7. Add Oyster Sauce, Soy Sauce, Sugar to taste. (Optional: Thicken stew with cornstarch/ water mix)...
*wipe sweat* EAT UP! :D
Saturday, February 6, 2010
CNY Recipes Part 1: Sliced Abalone with Lettuce
Chinese New Year is around the corner and I'm now planning the menu over the first few days of the festivities since Kays' family will also be in town. Cooking for 8-10 pax per meal is no easy feat! So, I usually pick the simplest recipes and outsource whenever possible to make my life a little easier. :P Of course there's actually no expectation from the family to really slave over the stove, but I guess I've inherited the need for tradition from my mom so it's a self-imposed thing to make sure everything is religiously followed.
First off, this is a quick and extremely simple recipe from mom which I'd use for CNY either for reunion dinner or on day 2 of the new year. The traditional way is really to stew the abalones in the can in a pot of water first for an hour or so, but if not done properly, the abalones sometimes become a little tough. This recipe ensure abalones are still tender and juicy~
Serves 4-6
Ingredients:
2 cans Abalone (I usually buy the Mexican or Australian ones - Calmex or New Moon are good)
Garlic, Chopped
1 Lettuce
- Gravy for Abalone -
2 Tbsp Oyster Sauce
2 tsp Sugar
1 tsp White Pepper
2 tsp Sesame Oil
1 tsp Corn Starch
1 Tbsp Water
1 Tbsp Soy Sauce
- To cook lettuce -
1 tsp Salt
2 tsp Chicken Powder
1 Tbsp Cooking Oil
Directions:
1. Open Abalone cans, drain and reserve stock. Thinly slice abalones
2. Bring large pot of water to boil. Add salt, chicken powder and oil. Blanch lettuce slices for approx 1 minute or until soften and quickly remove from pot & drain.
3. Mix oyster sauce, sugar, pepper, sesame oil, corn starch, water & soy sauce
4. In a non-stick pot, saute chopped garlic, add gravy mixture and cook til reduced
5. Add in abalone slices and bring to a boil
6. To serve, line dish with cooked lettuce and spoon abalone & sauce over. EAT UP!
First off, this is a quick and extremely simple recipe from mom which I'd use for CNY either for reunion dinner or on day 2 of the new year. The traditional way is really to stew the abalones in the can in a pot of water first for an hour or so, but if not done properly, the abalones sometimes become a little tough. This recipe ensure abalones are still tender and juicy~
Serves 4-6
Ingredients:
2 cans Abalone (I usually buy the Mexican or Australian ones - Calmex or New Moon are good)
Garlic, Chopped
1 Lettuce
- Gravy for Abalone -
2 Tbsp Oyster Sauce
2 tsp Sugar
1 tsp White Pepper
2 tsp Sesame Oil
1 tsp Corn Starch
1 Tbsp Water
1 Tbsp Soy Sauce
- To cook lettuce -
1 tsp Salt
2 tsp Chicken Powder
1 Tbsp Cooking Oil
Directions:
1. Open Abalone cans, drain and reserve stock. Thinly slice abalones
2. Bring large pot of water to boil. Add salt, chicken powder and oil. Blanch lettuce slices for approx 1 minute or until soften and quickly remove from pot & drain.
3. Mix oyster sauce, sugar, pepper, sesame oil, corn starch, water & soy sauce
4. In a non-stick pot, saute chopped garlic, add gravy mixture and cook til reduced
5. Add in abalone slices and bring to a boil
6. To serve, line dish with cooked lettuce and spoon abalone & sauce over. EAT UP!
Labels:
Chinese,
Mom's,
Quick and Easy,
Recipes
Friday, January 15, 2010
Mom’s Pan Fried Steak (煎牛排)
This is one of my all-time favourite dishes cooked by mom – I suppose this is comfort food for me like mac & cheese is to some others. The key is in using good quality beef cuts. You can’t go wrong with US Tenderloin fillets or ribeye otherwise. Steak slices shouldn’t be too thick - about 1-1.5 inch should be good enough. Also important to keep the natural beef juices that ooze out after you’ve seared them for the first time and reuse that as part of your sauce.
Serves 4
Ingredients:
Beef Fillet 200-250g (preferably tenderloin or ribeye)
- Marinade -
Garlic, crushed 2 cloves
Sugar 3 Tsp
Soya Sauce 2 Tbsp
Wine 1 Tbsp
Black pepper 1/2 tsp
Oil 1 Tbsp
- Sauce -
Worcestershire sauce 2 Tbsp
Cornstarch 1 tsp
Sugar 1 1/2 tsp
Beef juices whatever you can get!
Directions:
1. Cut fillet into 1.5 inch thick slices
2. Marinate with above along with garlic cloves for 30 mins. Oil should be the last item to go in to seal in the marinade
3. Heat oil and pan fry on high heat, searing each side till golden brown & 30-50% cooked
4. Remove steak slices from heat, cut into cubes and drain juices. Mix juices into sauce and set aside. Return steak to low heat, add sauce and allow to simmer for 1-2 mins. Taste & Eat up!