Monday, January 23, 2012

Chinese New Year Recipes Part 3 - Simple Garlic Steamed Prawns 蒜茸蒸中 蝦

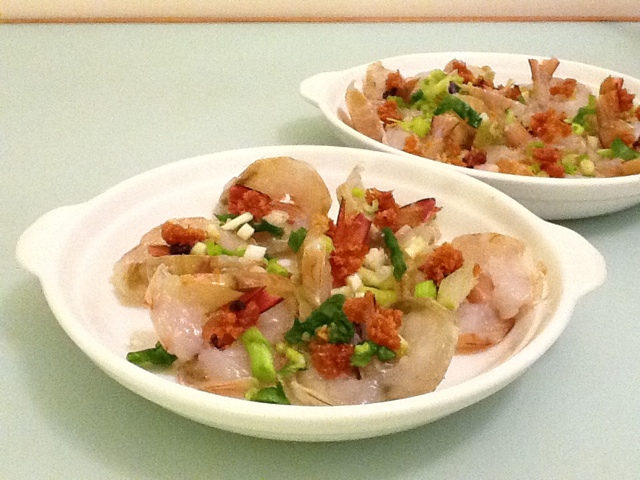
We are progressively getting stuffed to the brim with food! For dinner tonight one of the highlights was actually a very easy dish of steamed prawns drizzled in aromatic garlic oil, spring onions and XO sauce. Mom taught me this years ago but I've added my own twists since..

Dad bought some gorgeous, large Australian prawns from the wet market so i decided to keep the prearation simple to bring out the prawns' flavour.

Garlic Steamed Prawns 蒜茸蒸中蝦
serves 3-4

Ingredients
Prawns, large (roughly 15 pcs) 600g incl shell
Garlic, grated or finely chopped 6pcs
Spring onions, finely chopped 2-3 stalks
Corn starch 1 tsp
Salt 1/2 tsp
Oil 3 Tbsp
XO Sauce 1 tsp

Directions
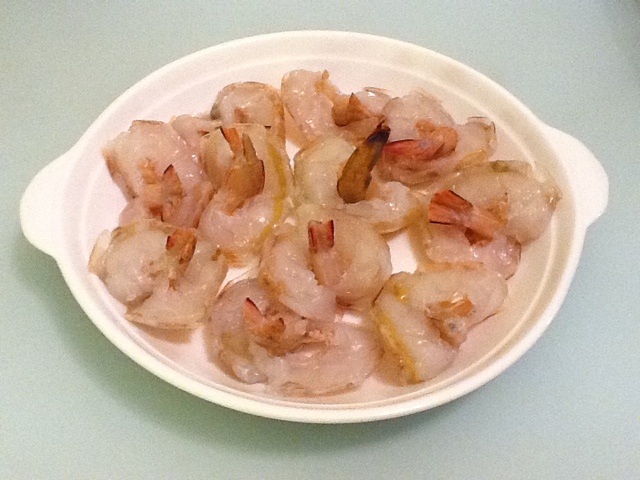
1. Wash and de-vein prawns. You can choose to keep the heads or remove them like i did (great for making seafood stock!).

2. You can lay out the prawns on a dish anyway you like, but in my case i like to do them "scorpion" style not just because i think it looks more impressive, but for practical reasons. This way after the prawns are cooked the shape holds and keeps seasoning in place (see photos and you'll know why!). Here's how - lay prawn on cutting board sideways, curled and gently slice prawn into half, leaving the top and tail ends connected. Flip tail end over, carefully pull through the hole in the centre and voila! Lay neatly on dish.

3. Lightly sprinkle corn starch over prawns and spread out evenly. Set aside.

4. In a lightly heated pan, add oil and saute garlic until very mildly golden brown. Note that if you grated the garlic this process happens much sooner and you need to keep stirring quickly to avoid burning the garlic. Add in salt, stir in XO Sauce and remove from heat.

5. Sprinkle spring onions over prawns, then evenly spoon hot garlic oil mixture over prawns. I love the sizzling sound when the oil hits the spring onions!

6. Prepare for steaming! In a wok, add hot water and bring to a bubbly boil. Even better if you have a steamer but I do it the old-fashioned way. Place dish on steaming rack and steam on medium heat for 5-7 minutes depending on the thickness of your dish. Once done, carefully lift lid and make sure no water droplets fall into the dish.

7. Serve immediately, and if you like, just a very small dash of soy sauce on top.

This is extremely easy, quick and minimal preparation time! You can actually add much more oil to fry the garlic, then drain off the excess oil through a fine mesh and keep it covered for future use! Think vegetable stir-fry or even over steamed fish!

Eat up!

Official Photographer - Dad (very dedicated!!)
Sous Chef - Jack

Chinese New Year Recipes for Reunion Dinner 2012 Part 2 - Braised BeefBrisket and White Radish in Chu Hau Sauce 柱候燜牛腩

Next on the menu was a Hong Kong classic - Braised Beef Briskets in Chu Hau Sauce! You can have this dish on its own, or add this to cooked noodles for a complete meal!

Mom's Braised Beef Brisket and White Radish in Chu Hau Sauce 柱候燜牛腩

Ingredients
Beef Brisket, cut into 2 inch cubes 800g
White Radish, cubed 1pc
Lee Kum Kee Chu Hau Sauce 柱候醬 1 Tbsp
Rock Sugar 冰糖 30g
Ginger 4 thin slices
Garlic clove, grated 1pc
Star Anise 1pc
Soy Sauce 2 Tbsp
Sugar 1 tsp or to taste
Salt 1 tsp
Oil 2 Tbsp
Water 1 1/2 cup
Oyster Sauce 1 Tbsp
Shaoxing Wine (or any rice wine) 1 Tbsp

Directions
1. Bring a pot or a deep pan to med-high heat. Saute ginger slices in about 1 Tbsp of oil, add salt and radish cubes, half of the rock sugar and allow to cook in its own juices for 10 mins or until radish is soft and cooked through. Remove from heat and set aside. Keep the juices too!

That little brown lump in the centre is the Rock Sugar
 2. Bring the pot to med-high heat again, add 1 Tbsp oil and pan fry Beef Brisket pieces until lightly golden brown.

Searing the briskets...so succulent~
3. At this stage, depending on hour fatty your beef is, you may wish to remove the meat from the pot, pour away the excess oil and rinse beef once through in hot water before returning the beef to heat.
4. Sprinkle in Shaoxing Wine,let it sizzle and stir in Chu Hau Sauce. Add 1 cup water and adjust amount as needed depending on the depth of your pot, making sure that the beef is just submerged. Add remaining Rock Sugar, and grated garlic. Bring to a boil and reduce heat to medium, cover with lid and let simmer for 45 mins to an hour, adding only small amounts of water as needed to prevent from drying out completely.

The beauty of this Mircoplane grater is that it immediately releases the aroma, but leaves no smelly fingers!
 5. After an hour, the sauce should have significantly reduced to a thick, dark, caramelised mixture. Add in cooked radish and its juices to the pot, add 1/2 cup water. Add oyster sauce, soy sauce, sugar to taste, and serve.


We loved the intense flavour and how the radish soaked up all the beefy goodness!

Eat up!


Sunday, January 22, 2012

Chinese New Year Recipes for Reunion Dinner 2012 Part 1 - Soy SauceChicken 䜴油雞

As promised, i will post more of our favourite recipes especially over this Chinese New Year since I am back in Hong Kong and home with the Maks. Jack (the younger Ah Mak) and I have vowed to cook up a storm this trip home and already we have planned the meals for the next few days, albeit simple dishes. We are of course working under very close supervision from mom who ensures we follow every step closely when it came to Por Por's recipes!

Menu for tonight:
- Soy Sauce Chicken
- Braised Beef Brisket with Radish
- Stir Fried giant Kailan stalk
- Yellow Cucumber Soup

First up is our favourite Soy Sauce chicken! According to mom, this works best with fresh chicken, not frozen, which up till recently is still readily available in HK, and the outcome is often more flavourful than what we could get in Singapore. However I believe that this will still work well with Sakura or Kampung chicken which i have yet to try, so if anyone does so before I do, let me know how it tasted!


Por Por's Soy Sauce Chicken 䜴油雞
Serves 4-6

Ingredients
Chicken, whole approx 1.5kg
Sugar 4-5 Tbsp
Garlic cloves, peeled 2pcs
Star Anise 1pc
Spring Onion, cut in 3 inch sections, 2 stalks
Soy Sauce 3/4 cup
Water 1/2 cup
Oil 2 Tbsp
Shaoxing Wine 3 Tbsp
Ginger, finely grated or chopped 1 Tbsp


Directions
1. Mix grated ginger in shaoxing wine. This will be used as a rub for the chicken

2. Wash and drain whole chicken, pat dry with kitchen towel. If your whole chicken comes with liver and gizzards, do the same as well.
3. Brush ginger wine (or rub with your hands, though gloves recommended unless you wanna smell of ginger) thoroughly, coating the outer shell as well as the insides and gizzards/ liver
4. Next, you basically try to simulate a rotissierie, in a wok, so have a pair of thongs or wooden spoon ready! In a hot wok, add the oil and saute garlic cloves. Carefully place chicken into the wok (thongs/ wooden spoon holding on to the insides...) and leave to pan fry on one side till golden brown. Repeat the same on all 4 sides till evenly coloured.

See how little oil it requires... enough fats on the skin!
5. Sprinkle 3 Tbsp of the soy sauce over the chicken, while rotating the chicken briefly. Then add remaining soy sauce, water, sugar, spring onion, star anise and bring to a boil.

6. Scoop some of the sauce into the inside of the chicken. Cover with lid and on medium to low heat allow to simmer for 15 mins, then turn chicken over and repeat for another 15 mins. Pierce chicken thigh to check that meat is cooked and juices are clear.
This is the meatiest part of the chicken
7. Leave chicken to cool before chopping up into pieces to serve.
Love the beautiful brown colour! Next time I will be gentler and not tear the skin!
 8. To prepare gravy, remove surface oil from the sauce used to cook chicken, bring sauce back to heat, simply add 1 tsp cornstarch to thicken slightly and pour over cut chicken pieces. (the lazy alternative is just to pop the sauce in microwave, minus the cornstarch, and voila!)


I think it doesn't look half bad :)

Got the thumbs up from the family on this dish, though really need to brush up on knife skills with chopping up the chicken!

Jack and his psycho murderer look...
Eat up!
Official Photographer - Mom
Sous Chef - Jack

Saturday, January 21, 2012

Long Hiatus...

This blog has been dormant for over a year now, since my last entry was as far back as Oct 2010, but quite on the contrary, life in 2011 had been full of ups and downs, both on the work and personal fronts!

For one, Ah Mak had not been cooking quite as much as she would have liked, but rather, her oven and endurance had been put to the test as baking went on overdrive last year! From cakes, cupcakes and a bit of both! I was amazed how many orders i received just by posting photos of my finished works on facebook.

Thankyou to all my lovely friends and new found friends for their support and the many opportunities to put my creativity to the test!!

For 2012, my resolution is to be much more active in sharing my love for cooking and baking, and also try to set up a proper website so that it is easier to take orders and properly showcase Frostings (that is the name i have in mind for now... Happy to hear any feedback!)

Will definitely blog again soon, since its chinese new year once more and i would love to share some healthy home cooking recipes!

Till then, gong xi fa cai!!!