Monday, January 23, 2012

Chinese New Year Recipes Part 3 - Simple Garlic Steamed Prawns 蒜茸蒸中 蝦

We are progressively getting stuffed to the brim with food! For dinner tonight one of the highlights was actually a very easy dish of steamed prawns drizzled in aromatic garlic oil, spring onions and XO sauce. Mom taught me this years ago but I've added my own twists since..

Dad bought some gorgeous, large Australian prawns from the wet market so i decided to keep the prearation simple to bring out the prawns' flavour.

Garlic Steamed Prawns 蒜茸蒸中蝦
serves 3-4

Ingredients
Prawns, large (roughly 15 pcs) 600g incl shell
Garlic, grated or finely chopped 6pcs
Spring onions, finely chopped 2-3 stalks
Corn starch 1 tsp
Salt 1/2 tsp
Oil 3 Tbsp
XO Sauce 1 tsp

Directions
1. Wash and de-vein prawns. You can choose to keep the heads or remove them like i did (great for making seafood stock!).

2. You can lay out the prawns on a dish anyway you like, but in my case i like to do them "scorpion" style not just because i think it looks more impressive, but for practical reasons. This way after the prawns are cooked the shape holds and keeps seasoning in place (see photos and you'll know why!). Here's how - lay prawn on cutting board sideways, curled and gently slice prawn into half, leaving the top and tail ends connected. Flip tail end over, carefully pull through the hole in the centre and voila! Lay neatly on dish.

3. Lightly sprinkle corn starch over prawns and spread out evenly. Set aside.

4. In a lightly heated pan, add oil and saute garlic until very mildly golden brown. Note that if you grated the garlic this process happens much sooner and you need to keep stirring quickly to avoid burning the garlic. Add in salt, stir in XO Sauce and remove from heat.

5. Sprinkle spring onions over prawns, then evenly spoon hot garlic oil mixture over prawns. I love the sizzling sound when the oil hits the spring onions!

6. Prepare for steaming! In a wok, add hot water and bring to a bubbly boil. Even better if you have a steamer but I do it the old-fashioned way. Place dish on steaming rack and steam on medium heat for 5-7 minutes depending on the thickness of your dish. Once done, carefully lift lid and make sure no water droplets fall into the dish.

7. Serve immediately, and if you like, just a very small dash of soy sauce on top.

This is extremely easy, quick and minimal preparation time! You can actually add much more oil to fry the garlic, then drain off the excess oil through a fine mesh and keep it covered for future use! Think vegetable stir-fry or even over steamed fish!

Eat up!

Official Photographer - Dad (very dedicated!!)
Sous Chef - Jack

Chinese New Year Recipes for Reunion Dinner 2012 Part 2 - Braised BeefBrisket and White Radish in Chu Hau Sauce 柱候燜牛腩

Next on the menu was a Hong Kong classic - Braised Beef Briskets in Chu Hau Sauce! You can have this dish on its own, or add this to cooked noodles for a complete meal!

Mom's Braised Beef Brisket and White Radish in Chu Hau Sauce 柱候燜牛腩

Ingredients
Beef Brisket, cut into 2 inch cubes 800g
White Radish, cubed 1pc
Lee Kum Kee Chu Hau Sauce 柱候醬 1 Tbsp
Rock Sugar 冰糖 30g
Ginger 4 thin slices
Garlic clove, grated 1pc
Star Anise 1pc
Soy Sauce 2 Tbsp
Sugar 1 tsp or to taste
Salt 1 tsp
Oil 2 Tbsp
Water 1 1/2 cup
Oyster Sauce 1 Tbsp
Shaoxing Wine (or any rice wine) 1 Tbsp

Directions
1. Bring a pot or a deep pan to med-high heat. Saute ginger slices in about 1 Tbsp of oil, add salt and radish cubes, half of the rock sugar and allow to cook in its own juices for 10 mins or until radish is soft and cooked through. Remove from heat and set aside. Keep the juices too!

That little brown lump in the centre is the Rock Sugar
 2. Bring the pot to med-high heat again, add 1 Tbsp oil and pan fry Beef Brisket pieces until lightly golden brown.

Searing the briskets...so succulent~
3. At this stage, depending on hour fatty your beef is, you may wish to remove the meat from the pot, pour away the excess oil and rinse beef once through in hot water before returning the beef to heat.
4. Sprinkle in Shaoxing Wine,let it sizzle and stir in Chu Hau Sauce. Add 1 cup water and adjust amount as needed depending on the depth of your pot, making sure that the beef is just submerged. Add remaining Rock Sugar, and grated garlic. Bring to a boil and reduce heat to medium, cover with lid and let simmer for 45 mins to an hour, adding only small amounts of water as needed to prevent from drying out completely.

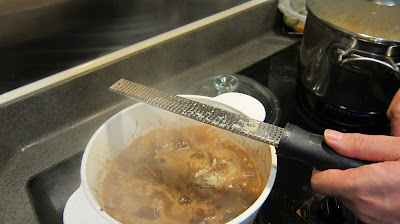
The beauty of this Mircoplane grater is that it immediately releases the aroma, but leaves no smelly fingers!
 5. After an hour, the sauce should have significantly reduced to a thick, dark, caramelised mixture. Add in cooked radish and its juices to the pot, add 1/2 cup water. Add oyster sauce, soy sauce, sugar to taste, and serve.


We loved the intense flavour and how the radish soaked up all the beefy goodness!

Eat up!


Sunday, January 22, 2012

Chinese New Year Recipes for Reunion Dinner 2012 Part 1 - Soy SauceChicken 䜴油雞

As promised, i will post more of our favourite recipes especially over this Chinese New Year since I am back in Hong Kong and home with the Maks. Jack (the younger Ah Mak) and I have vowed to cook up a storm this trip home and already we have planned the meals for the next few days, albeit simple dishes. We are of course working under very close supervision from mom who ensures we follow every step closely when it came to Por Por's recipes!

Menu for tonight:
- Soy Sauce Chicken
- Braised Beef Brisket with Radish
- Stir Fried giant Kailan stalk
- Yellow Cucumber Soup

First up is our favourite Soy Sauce chicken! According to mom, this works best with fresh chicken, not frozen, which up till recently is still readily available in HK, and the outcome is often more flavourful than what we could get in Singapore. However I believe that this will still work well with Sakura or Kampung chicken which i have yet to try, so if anyone does so before I do, let me know how it tasted!


Por Por's Soy Sauce Chicken 䜴油雞
Serves 4-6

Ingredients
Chicken, whole approx 1.5kg
Sugar 4-5 Tbsp
Garlic cloves, peeled 2pcs
Star Anise 1pc
Spring Onion, cut in 3 inch sections, 2 stalks
Soy Sauce 3/4 cup
Water 1/2 cup
Oil 2 Tbsp
Shaoxing Wine 3 Tbsp
Ginger, finely grated or chopped 1 Tbsp


Directions
1. Mix grated ginger in shaoxing wine. This will be used as a rub for the chicken

2. Wash and drain whole chicken, pat dry with kitchen towel. If your whole chicken comes with liver and gizzards, do the same as well.
3. Brush ginger wine (or rub with your hands, though gloves recommended unless you wanna smell of ginger) thoroughly, coating the outer shell as well as the insides and gizzards/ liver
4. Next, you basically try to simulate a rotissierie, in a wok, so have a pair of thongs or wooden spoon ready! In a hot wok, add the oil and saute garlic cloves. Carefully place chicken into the wok (thongs/ wooden spoon holding on to the insides...) and leave to pan fry on one side till golden brown. Repeat the same on all 4 sides till evenly coloured.

See how little oil it requires... enough fats on the skin!
5. Sprinkle 3 Tbsp of the soy sauce over the chicken, while rotating the chicken briefly. Then add remaining soy sauce, water, sugar, spring onion, star anise and bring to a boil.

6. Scoop some of the sauce into the inside of the chicken. Cover with lid and on medium to low heat allow to simmer for 15 mins, then turn chicken over and repeat for another 15 mins. Pierce chicken thigh to check that meat is cooked and juices are clear.
This is the meatiest part of the chicken
7. Leave chicken to cool before chopping up into pieces to serve.
Love the beautiful brown colour! Next time I will be gentler and not tear the skin!
 8. To prepare gravy, remove surface oil from the sauce used to cook chicken, bring sauce back to heat, simply add 1 tsp cornstarch to thicken slightly and pour over cut chicken pieces. (the lazy alternative is just to pop the sauce in microwave, minus the cornstarch, and voila!)


I think it doesn't look half bad :)

Got the thumbs up from the family on this dish, though really need to brush up on knife skills with chopping up the chicken!

Jack and his psycho murderer look...
Eat up!
Official Photographer - Mom
Sous Chef - Jack

Saturday, January 21, 2012

Long Hiatus...

This blog has been dormant for over a year now, since my last entry was as far back as Oct 2010, but quite on the contrary, life in 2011 had been full of ups and downs, both on the work and personal fronts!

For one, Ah Mak had not been cooking quite as much as she would have liked, but rather, her oven and endurance had been put to the test as baking went on overdrive last year! From cakes, cupcakes and a bit of both! I was amazed how many orders i received just by posting photos of my finished works on facebook.

Thankyou to all my lovely friends and new found friends for their support and the many opportunities to put my creativity to the test!!

For 2012, my resolution is to be much more active in sharing my love for cooking and baking, and also try to set up a proper website so that it is easier to take orders and properly showcase Frostings (that is the name i have in mind for now... Happy to hear any feedback!)

Will definitely blog again soon, since its chinese new year once more and i would love to share some healthy home cooking recipes!

Till then, gong xi fa cai!!!

Saturday, October 23, 2010

Review: Tampopo Restaurant @ Liang Court - Japanese Ramen with a Beefy Twist!

I apologise for not posting this entry sooner. That's because everytime I visited Tampopo since the start of this month where they have the Beef Soup Stock Ramen/ Udon promotion, I have been too anxiously slurping up my noodles to remember to take photos!

By now you'd know that I'm addicted to Ramen. Tampopo has always been well known for their Black Pig Shabu Shabu Ramen, but from now till 7 Nov 2010 (not much time left!!) they have launched a series of ramen and udon that has a beef bone soup base instead of the conventional Tonkotsu (pork-bone soup) ones.

Being spoilt for choice with ramen joints sprouting everywhere in Singapore, this has been a welcomed (and very pleasantly surprising) change. I have gone to Tampopo for their Rich Beef Udon (below) 3 times this month, and also got Kays to order their Original Beef Ramen so that I could steal some of that too!

Rich Beef Nabe-udon

On arrival, the lovely rich aroma of the beef stock filled the air, somewhat like an oxtail stew. The sheen of the soup came from the glorious beef collagen (good for skin!) and because it's all scalding hot, I quickly spooned over the soup onto the raw egg so that the top portion gets semi-cooked too. The thinly sliced beef is nothing short of expectations, with marbled fats lining the edges and perfectly cooked. You are forced to slurp the soup ever so gently because of the heat, but that's how you would best savour it anyway! It's been a while since I tasted something that made my eyes open wide with glee, and in Kays' words - made me want to 跑沙滩 (translated: run along the beach in slow motion)... Not sure what I mean? 

http://www.youtube.com/watch?v=hHBMl7KSmc0 

Original Beef Ramen - Shio flavour

Kays' Original Beef Ramen uses a similar soup base, but unlike my claypot version which boils and thickens the soup, it is lighter but just as tasty. This one comes with a couple of slices of pan-fried steak, which is succulent and sweet, and sticks of chewy Konnyaku that we're familiar with in Oden. The ramen series also feature Miso, Kimuchi and Wasabi flavours which I have yet to try. If anyone has any feedback on these, do let me know please! 

Remember, it's till 7 Nov so there's not much time left! Not sure if their other outlets under the Tampopo family (such as Tarafuku @ 313 Somerset) has the same promotion, but I'm sure the Liang Court and Takashimaya branches definitely has it, so hurry! Hopefully enough people love this as much as I do and Tampopo makes this a permanent menu item! *fingers crossed*

9 out of 10
177 River Valley Road
#01-23/24 Liang Court Shopping Centre
Tel: +65 6338-3186
Opening Hours: 
Daily 11:30am - 10:30pm
391 Orchard Road
#B2-33 Takashimaya Shopping Centre 
Tel: +65 6235 2318
Opening Hours: 
Daily 11:00am - 10:00pm

Sunday, October 10, 2010

Review: Ippudo Tao @ UE Square

This post has been long overdue, but nonetheless... here goes~

Ippudo Tao (the new branch of Ippudo @ Mandarin Gallery) has now been opened for about 2 months at UE Square along Mohammed Sultan, River Valley. I was really excited when they were still renovating a few months before that because we'd no longer have to fight the long queues at their flagship store in Orchard, and still get to taste their gorgeous ramen. I can now officially say that Singapore's best ramen are all within 1km radius of my workplace! Yeah!!

More about Ippudo Tao. This branch is so named because of their tie up with the Japanese Drum performance group Tao. The group doesn't actually perform here, but their live shows are screened at the restaurant.

Menu-wise, while Ippudo @ Mandarin Gallery has only 2 main flavours - Shiro (white) and Aka (Red), Ippudo Tao's range is slightly different. Here, "Shiro" is still on its menu as the main offering - basically the original Hakata-styled milky pork bone soup base (Tonkotsu) paired with white skinny noodles, cooked to the desired firmness.

In addition to the above there is also a new "Aka" which is different from the one at the original branch (see pic below). This Aka consists of a Tonkotsu base with Miso paste, stir-fried minced pork as its toppings, plus it is paired with CURLY, skinny noodles (kinda like instant noodles appearance-wise).

Finally, my personal favourite is the new "Kuro" (black), which like Nantsuttei, is Shiro with Oomph - topped with the Aromatic garlic Mayu (black garlic oil) and is served with yellow thick noodles. After trying all 3 types, I now regularly order the Kuro BUT substitute with the Shiro skinny noodles. The staff usually gets a bit confused and tells me it can't be customised, but they will always do it for you once they get confirmation from the manager. Just my personal preference! :)  


 Aka Tamago Ramen $17 ($15 for just ramen without the half-boiled egg)

Gyoza with "skin"!

Like their first outlet, consistency (especially the tamago done-ness) is still sometimes an issue, but they usually get it right. Also for a few extra dollars, you can turn it into a set lunch that includes a salad, gyoza and a soft drink!

From the time that they've opened, the menu has vastly expanded to include a whole host of izakaya items such as yakitori and kushiage. I'd strongly recommend their fried lotus root chips - a surprisingly light but yummy accompaniment to a happy hour beer (or Coke in my case!).

Business has been brisk, supported by many of my colleagues and the place is also filled in the evenings. Roadside parking is now a challenge again along Mohd Sultan Road, so be warned!

Of course it's in Ah Mak's Ramen Must Try List! *SLURP*

9 out of 10

207 River Valley Road
#01-55/56
UE Square
Singapore 238275
Tel: +65 6887-5315

Opening Hours:
Mondays to Thursdays
11am-3pm
5pm to midnight
(Last order at 10pm)
Fridays to Saturdays
11am to 3pm
5pm to 2am
Sundays
11am to 11pm
(Last order 10pm)

Saturday, September 25, 2010

I'm the Bakezilla!

It's been a long time since I last blogged - mainly because almost all weekends over the past couple of months had been fully occupied with baking and cake decorating.

Aside from fulfilling orders for a few friends, Cor & I have also recently completed the PME Professional Diploma - Sugar Paste Module @ Bake-it-Yourself, which helped to improve our sugar crafting skills given that I've really been self-taught so far, and saved lots of time and heartache spent to trial and error on my own. The course itself was rather intense, because it takes up a significant amount of time for each class, but we all took away some valuable knowledge, and made a few great friends!

So here are some of my creations during the course:
Fruit/ Picnic Basket Cake
This cake was decorated with Frannie in mind as I brought this to her farewell party that evening. The theme was ER (Emergency Room) so I thought the "Fruit basket" may be apt. She is originally from the Philippines, and hence the smiley mango!

In this class we learnet more about patchwork cutters, embossers as well as how to create a fabric effect. Had some time to spare so decided to play with lustre dusts and butterflies

For our final project we were asked to create a tiered wedding cake. My theme was a little more Art Deco but didn't have enough time to finish up (because I encountered problems on the baking stage which took up way too much time!) 
I'm not totally happy with the outcome but I've definitely learnt lots from this project!

So after taking a week off at the end of the course, it was back to baking for friends again! First up was Cupcakes for Tiff's boys as Teacher's Day gifts:

Vanilla Butter Cupcakes with Chocolate Buttercream


And my most challenging project to date was for little Ian's 3rd Birthday - a 3D Mickey Mouse Clubhouse Cake! It took lots of planning especially around the architectural setup, some physics as well as making sure that from a design angle it actually resembled the MM Clubhouse!

This is what the real toy looks like:
And my finished product (Mickey, Pluto and Goofy figurines were provided by the birthday boy's parents):

Ah Mak's Mickey Mouse Clubhouse Cake

I was so glad that things turned out alright in the end, because there was some major cake drama in the morning where the weight of the head and hand couldn't hold due to the overnight humidity change! I had to redo some parts on the spot under lots of time pressure.

It felt amazing though, to see little Ian playing with the cake thinking that it's the real clubhouse! hehe...

I can feel that with each project, I'm "levelling up" like in RPG games (sorry the geek in me is speaking)! More coming up this month, so watch this space!